
A few days ago, a friend from work introduced me to probably one of the coolest blogs I’ve ever seen. I was immediately captivated; the presentation is just so, so top-notch. Good photography, awesome product, and really nice process descriptions. It made me realize I need to be taking more process photos. On cooking shows, the kitchens look beautiful because they’re very specifically lit, and the chef has a beauty zone he/she moves around in that a DP can light to. I want to try to do the same.
So I did. I brought a few strobes and a fair amount of gear up to our kitchen. Our kitchen isn’t big, and the first challenge was to find places for the lights that were out of range of being splashed or heated. I read a photo blog once that recommended a strategy for lighting a room on christmas morning; the advice was basically to put two strobes in the opposite corners of the room, then point them at the ceiling. The result looks very sky-lit, which is kinda ok I guess, but I want something more dramatic.
I ended up coming up with a scheme I called “Hot Corners”…basically I found an area near each corner of the kitchen to clamp a strobe, bouncing it into the corner. This gives everything more side-light (so upping my chances of nice rim lights, and less chance for big bright spec hits when I shoot down onto food), and also the bouncing softens everything up. The room is too small to use the flashes pointed directly out, so the bounce also throws away a bit of the excess energy.
I’ve been cooking on 5 different recipes all weekend, and have been shooting heaps of photos. Today I had one large-scale experiment that I got so preoccupied with that I accidentally erased one of my memory cards…so all the photos I’d taken to show I had game as good as Luxirare was undone by my own ambition. Sigh. Next time, everyone.
The Big Experiment, though! So, I wanted to step further into Sous Vide, and I wanted to compare manual stovetop cooking vs. the electronic switch I mentioned before. I REALLY wanted to get a USB thermometer mechanism that I could plug a thermocouple into, so that I could log temperature changes over the course of a long cooking session. I imagined having a nice, interesting (?) graph showing how difficult it was to control a pot of water on a gas burner over a few hours.
Trouble is, I couldn’t find such a device for less than about $160. I didn’t want to spend that, so I thought I might just have to skip it. Then I realized I had a really obvious way to show this, especially given that I want to take more photos:
What made this interesting was that I actually had two cameras going: one on me, and one on the thermometers. They were both hooked to my strobes, which were positioned to light me and the pot nicely without catching shadows from either camera, which in turn had been positioned not to catch the strobes or the OTHER camera. Getting all this straight in my head and in the kitchen was what led me to accidentally reformatting a memory card in preparation for this. However, it ended up working pretty nicely:
At least until one of my strobes died. I’ll do better next time.
But! As Andy pointed out in my last post, I found the temperature remarkably EASY to control on the stovetop. It was a large body of water, so it responded slowly to temperature changes. I found that if it drifted too high, it took a LONG time to cool down, and ‘shocking’ it with a cup of cold water only works so long…then you run out of room in the pot. So I ended up toasting the water every 10 minutes or so, then letting it sit with the burner off to cool. The drift range was around +- 2 degrees, with some larger exceptions a few times. But overall this is pretty manageable, especially for just melting chocolate. For cooking something like The Perfect Egg, where you only have a few degrees of play room and have a harder ceiling to steer clear of, I think I’d want something more precise.
This particular water bath was used to steep some cocoa butter in 1 lb of shredded horseradish (hence my terrible faces toward the end of one of those videos). A pound of horseradish is notably rougher than some fresh-cut onions. But the end result was pretty wild. Even wilder was dipping frozen apple juice spheres into the horseradish cocoa…it almost immediately formed a shell around the apple. Horseradish magic shell!
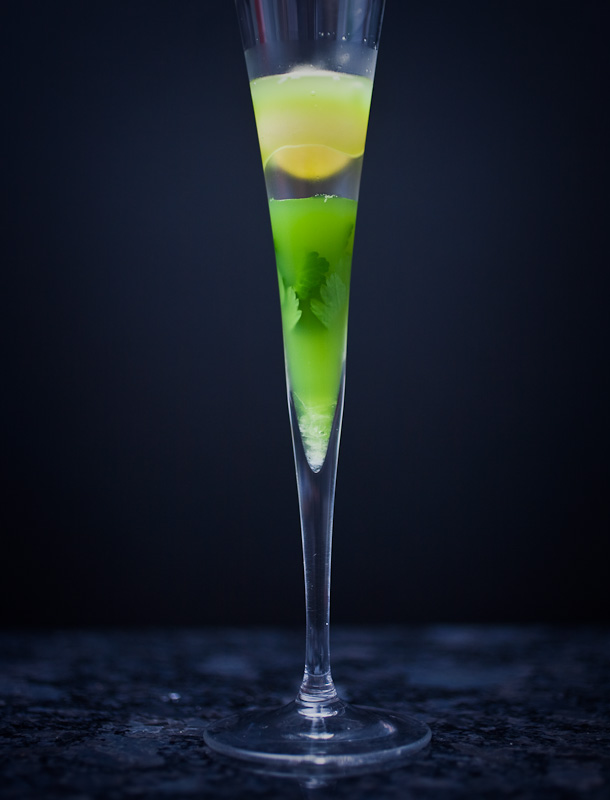
I found these great flutes at Nest downtown, and had this idea of plating this in reverse, with the celery juice on top of the sphere. These spheres are insanely delicate, though, so I couldn’t push them around too much to fit the glass. I ended up with a leak, but I’ll keep trying.
I’m going to pull back a bit on describing everything about this dish, because I’d like some of it to be a surprise for the friends I’ll share it with in a week or so. But I kinda wish I could specifically share it with Joe and Christopher: this was the dish they described to me when they first told me about this crazy new restaurant in Chicago that had just opened named Alinea.
